Starfish Therapies

December 16, 2017

What is Core Strength?

therapy ball

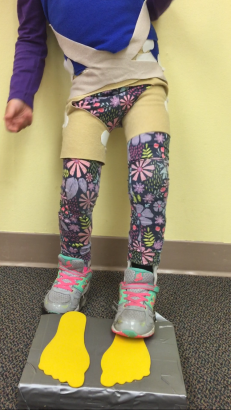
Why are pediatric PTs always talking about core strength and what does that term that is thrown around so frequently even mean? And is core strength the same as trunk strength and is that the same as core stability? Hopefully, this brief overview will help to clear the air!


Core: When we think of the “core” of the body, our first thought is the abdominal musculature.  While the abdominals play a crucial role in all of our functional movements, they are just one of the many important muscle groups that make up the “core.” We can also add shoulder, scapular, back, and hip muscles to the list. We can think of anything from the neck down to the upper leg as part of the “core.”


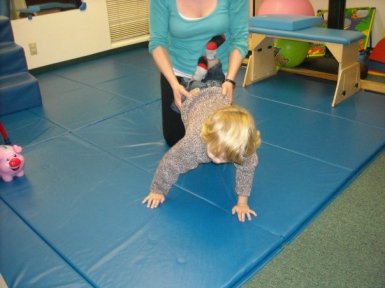
Core Strength: Core strength refers to the ability of the indicated muscle or muscles to perform as movers. For example, a sit up or moving from extension to flexion requires core strength.


Core Stability: Core stability refers to the ability of the indicated muscle or muscles to perform as stabilizers, therefore, preventing movement of a joint or joints. When we are referring to core stability, we are most often referring to how well the core muscles can work to prevent unwanted movement of the lower part of the spine and pelvis. For example, when we squat to pick up our kids, laundry baskets or grocery bags, we want the abdominal muscles to work as stabilizers to prevent unwanted movement of the lower spine.


Trunk Strength/Stability: Okay, okay, so what is trunk strength? Well, as pediatric therapists, we often use the term “trunk” and “core” interchangeably. They are just two different terms that mean the same thing. So, if you see both terms in a report or other documentation pertaining to your child or yourself, feel free to ask us! Most likely, we are talking about the same thing but we strive to improve our consistency and you can help by bringing it to your attention.


For more information on the importance of the core musculature as well as for tips/ideas on how to improve the function of the core, take a look at some of our previous blog posts.


Core Strength – Building a Solid Foundation


Core = More than Just Abs


Having a Ball with Core Muscle Strength


November 26, 2017

Weight Shifting and Trunk Elongation


We have been working on walking with some kids that are working on improving their weight shifting and all the mechanics that go with that. Many of them have hip weakness which we are addressing but we are also looking at other areas to address as well. With the hip weakness you can often see a trendelenberg pattern (when their hip drops on the leg they pick up to take a step with). One way kids counteract this is to lean their trunk towards the side that they are standing on when they pick up their other foot to take a step. This provides them some hip stability but it decreases their efficiency and increases their energy utilization because they now are actively moving their trunk side to side with every step. It also makes it harder to fix on a target when walking and can cause path deviation.

So, we decided to help them work on elongating their trunk while weight shifting onto the stance side. To do this, we used a balance board to simulate the weight shifting. As their hip strength and overall balance improves we can take the balance board away and have them shift into single leg stance but for now we decided to only add one new challenge to the task and let them keep both feet on a support surface. We placed a target above their right side and their left side that was just high enough for them to reach when they reached overhead.

Once we were set up, we asked them to shift over to one side and at the same time reach overhead to hit the target. This resulted in them lengthening their trunk on the side they were shifted to (as opposed to shortening their trunk because they were leaning to that side). Once they hit the target they shifted over to the other side and repeated the process over there. We did this in sets of 10. After that we did some overland walking with light tactile cues at their hips and verbal cues to reach overhead when they were on their stance leg.

Did it miraculously change their walking? No, but it started to introduce a new motor pattern that will require a lot of repetitions to become second nature, and it will require continued strengthening of the hips. But it is another component to helping with a more energy efficient walking pattern! Just remember, it takes lots and lots of repetitions to change a motor pattern – repeat, repeat, repeat…

What ideas have you tried?

October 29, 2017

Core Workout: Hungry Hippos meets Wreck it Ralph

I happened to walk by another one of my therapists using a really fun and creative way to work on core strength with kids. I know I have done my share of walkouts over a ball or peanut with a kiddo but this was so much more fun. In addition to working on the core, it also works on upper extremity strength, shoulder stability, and motor planning.

She helped to stabilize his feet on the ground while both of his hands were on a scooter board. There were several bowling pins set to the front and to an angle from the kiddo. He had to hold his core tight while pushing the scooter board out to knock over the bowling pin and then bring the scooter board back. The goal was to see how many he could knock over at a time. They had a target number and he ‘won’ that round if he hit the target number. You can always tell when a game is fun when they want to do more rounds even though they say on one break ‘this is hard.’ I’m pretty sure I would have trouble doing even one repetition!

Here is a brief video of the activity.

Has anyone else tried any other variations of this? We’d love to hear about them.

September 21, 2017

Wheelbarrow Walking

wheelbarrow walking

Do any of you remember doing wheelbarrow races as a child? I do! I remember thinking it was hysterical that someone was holding my feet and I was racing someone else on my hands. Well, as much fun as that was, wheelbarrow walking is actually a great tool to incorporate with kids to help them get and stay strong.

Wheelbarrow walking works on strengthening the arms and the core. It can also support coordinated activity because of the need to walk reciprocally on their hands, while keeping their head up to see where they are going, and keeping the core muscles turned on so that the person holding their feet can better support them.

I am a big fan of multi-piece toys such as puzzles and shape sorters. They naturally build repetition into an activity. For instance, you can put the puzzle at one end and the pieces at another end. Place one puzzle piece on your child’s back just like they were a wheelbarrow picking up a load. Then have them walk on their hands to the other end to put the piece in the puzzle. Turn around and head back for the next piece. Keep repeating until all the pieces are replaced.

So how do you vary this by child? That’s easy!

  1. Distance to walk – Start with shorter distances. If they are doing really well you can increase the distance by moving the puzzle board just a little further away.
  2. Number of repetitions – Start with carrying just one piece back at a time. If they seem to be tiring, start adding more than one piece to the wheelbarrow. This way they still complete the puzzle but you have decreased the number of repetitions.
  3. Where you are holding them – The closer to their arm pits you provide support, the easier it is for them. The closer to their ankles that you provide support, the harder it is for them. Just like goldilocks and the three bears, you want to hold them in just the right spot. This means that they can walk on their hands without letting their belly sag towards the ground. If you see their belly sagging (or back arching) you may want to move closer to their arm pits. Once they have mastered keeping their core strong, you can slowly move closer towards the ankles.

There are other variations to make this fun besides just completing a puzzle or a shape sorter. Here are a few ideas I had:

  1. Treasure hunt – Start with a treasure list and have the items hid in the room that you are in. Have them walk on their hands to collect the treasure. They can hold the items in the ‘wheelbarrow’ while they collect each of them.
  2. Race track – Create a race path that is clearly marked and use a stop watch to see how fast they can get around the race track. If they have to pause on the track it’s like taking a pit stop. Clearly, they’ll want to take less pit stops to get faster times. Be careful they aren’t going so fast that they start to sag at their core.
  3. Staying in place – Rather than walking on their hands, have them assume the position and put papers with different colors or letters or numbers in front and to the side of them. Call out a color (or number or letter) and have them use their hand to touch it. You can get tricky by telling them what hand to touch it with (similar to twister).
  4. Going backwards – You can do almost any of the above ideas backwards. It’s a great way to make the activity novel. You can also combine forward and backwards to make it extra tricky!

Since you are the one that will be helping, you want to make sure to take care of your back as well. Be careful that you aren’t bending over to support them. Use a rolling stool or a scooter board, or walk on your knees (but I would recommend knee pads if you are going to be doing this a lot).

September 13, 2017

Single Leg Stance

We often have parents come in and ask for us to help their child be able to stand on one foot better. Usually they have heard that this is a skill that all children should be able to do. But why? What does standing on one foot help with? Here are some of the skills that are improved when single leg stance improves:

  • Going up and down stairs
  • Kicking a ball
  • Stepping over obstacles
  • Getting dressed
  • Standing up from the floor
  • Hopping
  • Skipping
  • Walking with a narrow base of support (i.e. on a balance beam)


So what are some activities that could help your child to improve this skill? Here are a few:

  • Toe taps – Place a spot in front of your child and have them tap their toe on it. Make it a game by calling out numbers to see how many they can do. Or switch it up between left and right foot. You can do this on the ground, or raise the height to make it more challenging. You can also move the target from in front to diagonal to the side. ToeTaps
  • Foot on a ball – Find a ball and have your child try to hold one foot on top of it and maintain their balance. You can time them to see how long they can go for, or have two people doing it at once to see who can last the longest. Make sure to switch up feet. Softer, squishy balls are easier to balance while larger, firmer balls are harder to balance on.
  • Popping bubbles – This one is fun because what child doesn’t love bubbles? Blow bubbles and have them try to stomp on them to pop them! SLS bubbles
  • Stepping over obstacles – Have your child try to cross a room while stepping over obstacles in their way. You can use small books, pool noodles, toys, groceries, or anything that you can think of. Shorter and narrower are easier than taller and wider. Also make sure it is a stable obstacle and not a ball that will roll if they bump into it. You could also use painters tape to make obstacles across your hallway so they have to step over varied heights of tape.
  • Yoga – Tree pose is one of our favorites. Kids like to imitate it and they can ‘cheat’ by putting their foot down close to their stance foot if the knee is too challenging. single leg stance

What are some ways you work on single leg stance?

September 4, 2017

Fun with Painter’s Tape

Painters Tape

Looking for easy and fun activities for your kiddos to do at home? All you need is painter’s tape and a little imagination! Here are four different gross motor activities with simple set ups to work on balance, strength, motor planning, coordination, and body awareness.

  1. Weaving through spider web:  Use a hallway to span tape from one wall to the next in a varied pattern as seen in the picture. Have your kiddo step over, army crawl under, and crouch through to get to the other side. Giving them a chance to problem solve how to get from one end to the other works on motor planning and being able to adjust their body and avoid contact with the tape challenges their awareness of their body in space. Here are some posts on painter’s tape spider webs, and jungle vines (just adapt for painters tape)!
  2. Walk the line: walk forwards, backwards, sideways:  The beauty of painter’s tape is that it can easily be applied and removed from so many surfaces. Regardless of your floor type, you can create patterns on the ground for your kiddo to walk across. This challenges their balance and ability to move with a narrower base of support. You can also have them hop on one foot down the line or hop back and forth between lines to build strength and power. You can add more variety by having your child walk backwards or sideways! Here are some other post on similar ideas such as balance beams, more balance beams, and jumping paths – just adapt and use painter’s tape!
  3. Spider web walking:  In addition to lines, you can create a spider web out of tape and challenge your child to walk on the line to get different critters within the boxes or you can have them jump from box to box to avoid touching the spider web! Here is a longer post on this idea!
  4. Tic tac toss:  Take the tic tac toe game off the paper and turn it life-size by taping a grid on the ground. Use two different color bean bags to duel it out amongst family members or friends. If you want to add more physical challenge you can incorporate similar concepts to what is explained above including walking heel to toe to your chosen box or hop from square to square to drop it in rather than tossing.

Now grab some tape and let the fun begin!

July 23, 2017

It’s All About Motivation

Adventure

Many times I get asked about what kinds of activities we do with the kids, or how we get them to do what we want them to do when it may be hard work for them. The answer is always the same, it’s all about motivation. If you can make an activity into something that a child wants to do, then they will work hard at it, and usually repeat it multiple times.

I had written two posts a while ago about when we used songs to motivate kids that you might find interesting.

Well one of our other ways is to use obstacle courses, which we have talked about before. But how we make those obstacle courses fun is what this post is about! Here are a few ideas!

  • American Ninja Warrior Junior – I’ll be honest, I’ve never watched American Ninja Warrior. That being said, I’ve noticed a lot of our kids have, and they love it! We have been able to get more leverage from that show for motivating kids. We have done it in obstacle course format where we time them on the course (but they lose points if the quality isn’t there, so they don’t just rush through). We have created training programs for it so that the kids do exercises that will help them be American Ninja Warriors and then they get to create a course at the end of the session for fun. But the ‘training’ is where they put in the work. Although, even the courses they create are pretty challenging and work on the things that we would want them to work on.
  • Adventures – Some kids like to go on adventures. This could involve crossing a bridge (balance beam), climbing mountains (stepping stones), navigating the swamp or quicksand (crash pads), traversing lily pads (spots), rescuing friends (climbing up and down stairs), going into the dungeon (stepping up and down a ‘curb’ type step), setting off the flare for the support team (stomp rocket), using the magic key to open the secret door (making a basket with the basketball while standing on a balance board), crossing the forbidden forest (walking over a yoga mat with obstacles underneath to make it uneven), and the list could go on and on. Usually we have friends we rescue (a puzzle with animals, bean bag animals, stuffed animals) or we go collect treasure (a puzzle with different shapes) and the child gets to choose which we are doing on that adventure. That way they also have to go through multiple times.

What are some fun ways you have motivated kids?


June 11, 2017

Kneeling: Exploring New Heights

High kneel 3

Kneeling is a great position to help progress developmental milestones, as well as a way to work on strengthening hips and core. Depending on the activity it can also be a great way to work on arm strength.

Getting into kneeling allows kids to work on transitional movements, provides a new way for sitting, lets them explore balance and balance reactions, is a precursor for activities like climbing and pulling to stand, and it lets them see whats on a level above the floor providing them a different way to engage with their environment and toys.

Here are some ideas for kneeling:

  • Unstable – Use something that isn’t stable such as a cylindrical toy, a foam roller, a ball, or even a push toy. All of these will vary in their instability and you can also create some stability by holding it still while they get used to it. This allows them to play with flexing and extending their hips, weight bearing through their arms, activating their core for balance reactions as they try to find midline or a place of stability by moving the object forward and backwards. A toy like this one also has the added fun of sound!
  • At a higher surface – You can find a surface that is not too high and not too low. It can provide stability to allow them to play with their toys or even bang on the surface. With this they are learning balance also. Every time they lift their hand or engage with their toy they need to find a way to stay stable or they run the risk of toppling over and not being able to play. Once they start to learn that toys and fun are up off the floor this can lead to exploring and figuring out how to get into kneeling!
  • Transitions – Kneeling is also a great position to be able to transition into various positions. As you can see in the pictures kids can use kneeling as a way to play and to move into other positions. Set up toys around your child that they have to manipulate or move and weight shift to be able to access. Let them explore their movement and problem solve how to best interact with the toys. You can help them by showing them how to get into a kneeling position and see what they do from there.


There are lots of ways to modify these activities (and tons more that I’m sure I’ll think of as soon as this goes live!). I would love to hear how you incorporate kneeling into your child’s play!

May 22, 2017

The Power of the Calves

star jumps

I don’t know about you, but I have had many children over the years that really struggle to use their calf muscles in an efficient and effective way. This could be due to many reasons but there is probably some underlying weakness and coordination challenges. I have seen this a lot in my kids who are toe walkers. Now I’m sure some of you are saying ‘wait but they walk on their toes, doesn’t that mean they use their calf muscles and they should be nice and strong?’

Not necessarily. Because they tend to walk on their toes (this may look like they are up high on their tip toes or it may look like a shuffling walk with the foot mostly flat but never getting a heel strike first) they aren’t moving through the full range of motion at their ankles and so their calves are only working in a very small range. For the kids up on their tip toes they are really strong in that one position but they would fatigue pretty quickly if you were to ask them to do multiple heel raises in a row. For kids whose feet look flatter but they are still not hitting with their heels first, they are tending to constantly stop a ‘fall’ forward by catching themselves on their foot and then ‘falling’ forward onto the next foot. They aren’t using their calves to help them push off to lead into the step, but rather ‘falling’ into the step.

So as you can see calves work in two ways, they help to control your step forward by supporting your body weight as the muscle slowly lengthens, and they also help to push off by shortening the muscle to give you power to go into the next step. These are also helpful for jumping and running activities to name a few.

Hopefully all this is making sense. I really started this post to give you some ideas for how to work on the calf muscle to help your kiddos use them more effectively and efficiently!

  • Scooter Board Push – I was inspired when I came across this post. I have a few kids that I have been trying to get creative on ways to work on their calves. I actually tried this one out and the kiddo I was working with loved it! He loves to do puzzles so we put the puzzle pieces on one side of the room and were assembling it on the other side of the room so he had to push me back and forth to get all the pieces. Because of the size of the room we had some extra challenges because he had to turn a corner as well causing him to work on his motor planning. In the beginning he had some trouble and would try to go down on his knees to push or I would help him too much so he was just walking and not pushing through his feet but he eventually got it and was so excited when we would get going fast and when we could turn the corner without running into the crash pad! I completely recommend this activity. Just an FYI, carpet causes them to work harder!
  • Wall Push Offs – You can do this one on a scooter or a swing. With a scooter you can have competitions to see how far you can push each time and if you can get further than your last time. Or you can set up bowling pins that when they push off the wall they have to try to knock them over and see how many tries it takes before they’ve knocked them all over. You could also use an exercise ball and have them push off of that and see how many pushes it takes to get down the hallway, and then try to get fewer pushes on the way back! Obviously you would have to move the exercise ball to them each time and hold it stable while they push.
  • Furniture Gliders – With the smooth side down on the furniture gliders, have them put their hands on the top side. Then create a course with painters tape and have them push their hands all along the path. The key is to make sure they are pushing with their feet and not dropping down onto their knees. You can change up the course and make it straight lines, curved lines, zig zag lines, or have it be a treasure hunt/maze where they have to follow the lines to get to bean bags or puzzle pieces and then they bring them out of the maze before going back in to collect the next one! If you don’t have furniture gliders you could do this with bear walking but its definitely more fun with being able to push yourself around! You could also try putting their hands on a scooter and pushing that way if you don’t have furniture gliders!
  • Step Downs – Stepping down slowly really helps to work on having the calves control the body weight as it lowers down. That being said, this is often hard for kids to control. We have tried putting a stomp rocket on the ground below the step so they have to step onto the stomp rocket to get it to go. If possible I recommend doing this without rails. You can change the height of the step to make it easier or harder. And the kids love to shoot the stomp rocket. We generally have targets that we aim for. You can give points to each target and have them try to get a certain number of points by hitting them with the rocket.

What are some ideas you have for calf strengthening with kids?

May 14, 2017

Ideas to Target the Core

wheelbarrow

bridging

modified plank

I don’t know about you, but I know my core muscles (abdominals, back extensors, shoulder girdle, and hips) can always stand to be stronger. This also goes for our kids, typically developing as well as kids with a neuromuscular challenge. While there are lots of ideas for targeting specific muscle groups, sometimes its good to do exercises that get a bigger bang for their buck. There are some exercises that can target multiple areas of the core at the same time. Here are a few:

  • Planks – Planks are great for getting all areas of the core. Of course they are not easy, especially if you want to maintain good form. For those just starting out with a plank you can go on your hands and knees and bring your hips in a straight line with your trunk. To make it harder to you can move to your hands and toes (or forearms and toes) and keep your whole body in a straight line. To make it even easier, you can use a bench or a table and put your hands on there so you are at an incline. The goal is to be able to hold your body in a straight line without having your belly sag or your hips sticking up in the air. Find the level of difficulty that lets you maintain that straight body. And start small. If you can hold it for 15 seconds then do that. Slowly increase your time and then increase the difficulty!
  • Wheelbarrow Walking – This also targets multiple areas, the hips don’t get as much work unless you are being supported by the ankles, but its still great for the shoulders and trunk. You can use a scooter board and sit on it and hold them by their trunk, or their hips, or their thighs, or their ankles (the further out you hold them, the harder it is). Use a hallway and have something fun like a book or a puzzle at the end that they get to do something with each time they get down there. You can also use a rolling stool. This changes the angle and makes it harder. Even harder is you just standing and walking while supporting them. Again, the goal is to hold the body straight so find the level of support that allows them to do this and gradually work your way out towards their ankles and up to you standing!
  • Walk Outs – Use an exercise ball or a peanut ball or even a foam roller (the exercise ball will be the hardest because it can move in multiple directions). Place a puzzle and its pieces a little out of reach and have them lie on their stomach on the ball and then slowly walk out their hands as far as they can go while maintaining a straight trunk and hips. Then put a piece in the puzzle and walk their hands back. Keep repeating until all the pieces are done. You can also use beanbags, or other toys that involve multiple pieces.
  • Bridging – This one really targets the hips but also works on the trunk. I’ve talked about ways to work on this in other posts. You can get creative with how to make it fun, such as balls or cars going underneath. You can also make it harder by putting one foot on an elevated surface and the other one on the floor, or both feet on an exercise ball or peanut (or other unstable surface). You could just do one leg and keep the other leg up in the air. You can do reps of up and down, or you can go up and hold it for longer and longer periods of time.

What are some of your favorite ways to work on the whole core?

Next Page »

Blog at WordPress.com.