Starfish Therapies

February 11, 2016

How to Make a Tennis Ball Monster

tennis ball monster

What you need: A tennis ball, scissors or knife, marker, small manipulatives such as paperclips, pennies, beads, pom poms, etc.

Steps:

  1. A whole or slit needs to be cut across the ball first for the mouth. The adult should do this possibly before beginning the activity with the child. This can be difficult to do so be fully away of what direction the knife it going and how you are pushing down on it. I prefer to rotate the knife back and forth to make a puncture first. It’s then easier to put the knife into the ball and saw back and forth to make a mouth. It’s ok if it’s not straight, it will still work the same. The wider you make the mouth, the easier it will be for the child to open it. The smaller the slit the more they will have to squeeze and the difficulty increases.
  2. Let the child draw a face on the ball with a marker. They can get creative and make it into an animal instead of a person as well by drawing on ears, whiskers, etc.
  3. Have them pick different items to place in the ball. Pennies, buttons, paperclips, etc. are all going to be easier and they won’t have to squeeze open the ball as much with their other hand to place these in. Items such as pom poms, beads, and marbles will increase the difficulty level once they’ve mastered the easier manipulatives.

What this works on:

  • Fine motor strength: squeezing the ball for an extended amount of time to place all the items in can be challenging and build on fine motor strength and endurance.
  • Bilateral hand use: They have to use two hands to place the pieces in. The ball is round so they have to pick it up to squeeze and then use their other hand to place the items into the ball.
  • Pincer grasp: Picking up items off the floor and placing them into a smaller hole can encourage pincer grasp.
  • Imaginative play: They can pretend the ball is eating and make sounds or open and close its mouth to make it talk. It’s great to work on your child’s imagination if this is an area that they have trouble with.

Adapting it:

  • If they won’t use two hands to place the items in. Do hand over hand to help them hold the tennis ball, and allow them to place the items in. You’ll find you can release after awhile when they begin to get it.
  • Have them take items out of the ball instead. This still encourages them to squeeze the ball or to isolate their fingers and stick them inside. You may have to place something of high interest into the ball to work on this.

Or, if you want to buy a fabulous version, with fun games and instructions included visit Therapy Fun Zone! (Check out their other fun products and ideas as well – this site has so much to offer) And, here are a ton of blogs giving you awesome ideas for how to use this toy – the best part about this version is that you can get them wet and messy – our kids have loved playing with them in shaving cream and other messy materials!

Munchy Ball 1 Munchy Ball 2 Munchy Ball 4 Munchy Ball 5

April 9, 2014

Making Use of the Junk Drawer

Filed under: Developmental Milestones — Starfish Therapies @ 9:00 am
Tags: , , , ,

paperclips

Wait don’t throw that away! Our junk drawers can hold some quick and easy fine motor and visual activities for our kids. Let’s get creative with what we unknowingly have in our possession already. Here are some great ideas and activities to do with 3 things that may be in a junk drawer:

Rubber band:

  • Place the rubber band on the index finger and thumb and have them open their fingers against the resistance of the rubber band. They can also put the band on their thumb, index and middle finger to work on strengthening the tripod grasp as well.
  • Stretch the rubber bands over blocks and paint the bands for a fun stamp.
  • Stretch the rubber bands around a small white board and hang the board up or leave flat on the table in front of child. They can place anything under the bands to make their own picture. Animals, crayons, or any small item that’s available. Picking up the bands works on pincer grasp and they have to use two hands to both hold the band and place the item under. Hanging the board up would also work on reaching with bilateral hand use.

Paperclips:

  • Make a chain of paperclips or undo a chain of clips. This works on motor planning, bilateral hand use and finger dexterity skills. You can pretend its fun jewelry after putting it together as well.
  • Hang a paperclip from a string and add a balloon to the paperclip. You can adjust the height to play different visual and gross motor games with this. Up high you can try hitting the balloon with your hand. Or use a bat or stick to make it trickier for those that have more visual difficulties. You can also have the kids jump and try and hit the bottom of the balloon with their heads. Bringing the balloon low they can work on kicking. They also can lay on their stomachs or backs and try and hit the balloon with their hands or feet together to work on flexion and extension strengthening.

Washers:

  • Sorting games: you can sort the different kinds (rubber, metal), as well as the different sizes. Painting them different colors, can give them another way to sort them as well.
  • Place the washers in different spots and make a game out of collecting the washers. Give them an unsharpened pencil to walk with in one hand and they have to go around and collect the washers to place on the pencil. Increase the difficulty by having them collect in a certain pattern. This is great for eye-hand coordination, bilateral hand use and visual tracking skills.
  • Play a toss game. Taking a paper cup and placing it a small distance from your child you can play a tossing game in standing, sitting, on their belly, etc.

Next time you empty out that junk drawer, get creative and explore the different uses of everyday items that are found in your home. Your kids will love it!


August 9, 2013

The Un-Block

Filed under: Developmental Milestones — Starfish Therapies @ 7:00 am
Tags: , , , ,

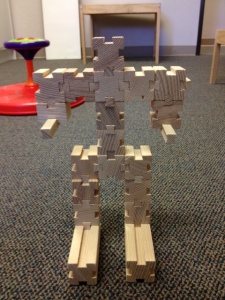
unblock

When we went to the American Occupational Therapy Association (AOTA) conference this year we saw this great toy that one of the vendors was selling.  It’s called the Un-Block.  I of course had to get it because I love any type of building toy and thought it looked like such a novel idea.  (Since I’m a PT, I was crossing my fingers that the OT’s would be able to use it.)  Luckily our OT’s have been using this toy and were able to give me some feedback on what they were using it for.

The biggest thing they said kids had a challenge with was motor planning how to connect the pieces.  Because it is a precise fit and the pieces slide together, many kids found this challenging and required hand over hand assist while working on the motor planning.  A lot of times they just wanted to snap them together (similar to legos) but they won’t connect that way.

Another challenge was lining the pieces up together in order to slide.  Currently the pieces are all the same color so it requires increased use of the visual system to get accurate alignment as well as precision.  Several kids would get it close and then keep attempting in the same spot, so they required assistance to problem solve and make adjustments so that the pieces would fit together.  We talked about that it would be great if the blocks were different colors or had the interlocking parts defined out by a color/boundary.  This is easy enough to add on your own if you think your kids would benefit from this.

This toy also allows kids to work on their grasps, such as the three jaw chuck or pincer grasp, when picking up the pieces and manipulating them such that they fit together.  In addition, the get to work on fine motor control, precision and coordination.

Lastly, they get to have fun with their imagination and build things!

While talking about the pieces being different colors we were also brainstorming that kids could do patterning, or create additional designs, or just get the visual assist that may be needed.

Have any of you played with this toy?  If so, how are you using it?

December 14, 2012

Duct Tape Tote and Wallet

Filed under: Developmental Milestones — Starfish Therapies @ 12:00 pm
Tags: , , , ,

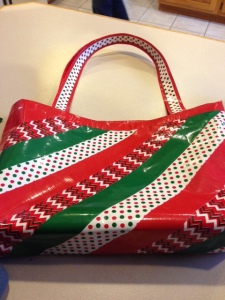
duct tape purse1 duct tape purse2 duct tape wallet1 duct tape wallet2

As you can tell by reading my posts this week my nephew and I hung out over the weekend.  Well, my mom had bought various colors and patterns of Duct Tape and we decided to get crafty making a gift for his mom and one for himself as well!  We followed directions from these blogs (although for the tote we made our own straps):  Tote and Wallet.

I won’t bore you with the how-to’s since you can read that above.  I found these projects to be great for pattern recognition (my nephew picked out the pattern and was responsible for telling me which one was next for the tote).  We also worked on measuring to measure the correct lengths of tape as well as visual perceptual skills to know how to line up the tape to be even and/or to cover the fabric. We also got to work on cutting and tearing skills as we made the tape into the correct lengths.  He also picked out the size of the tote that he wanted.  We folded the fabric so he could get an idea and he would say bigger or smaller until we got it just right. He also asked to add the credit card pocket in his wallet so that he could put gift cards that he gets for the holidays in there (all his idea).

What was challenging was dealing with the tape with an almost 9 year old boy.  Duct tape is quite sticky and when it is lying sticky side up it sticks to everything, especially when someone is rolling the rolls of tape around or waving the ruler around or even just moving their hands around.  Also, its hard to set the tape down sticky side up because it is sticking to your fingers.  Despite the frustrations with tape is was worth it just to see how proud he was of the tote he designed for his mom!

PS – I would definitely recommend adult assistance with this project.

What projects have you made with Duct Tape?

December 12, 2012

Magnetic Toy Imaginary Play

Filed under: Developmental Milestones — Starfish Therapies @ 12:00 pm
Tags: , , , ,

I have always wanted to play with Magna-Tiles especially when I have read about them in blog posts or heard parents talking about them.  I decided to buy a set and had my nephew help me check them out.  He of course was excited (and he’s almost 9) because he had played with them before.  He even tried to convince me to give them to him!  At first we just tried out building structures and seeing what we could come up with.

magnatiles1

Then he went into the closet where his toys are and came out with this other cool toy that I had never seen before.  It was SmartMax Set.  It had two sized pillars and a bunch of balls.  All of which were magnetic.  We combined it with our Magna-Tiles to create a really cool structure.  I will admit it collapsed on us quite a few times until we figure out exactly where the magnetic attraction would be greatest to combine the two toys.

magnatiles3

And then, of course we had to add figurines because this became a fortress with a force field and in the Magna-Tile box were prisoners who we were trying to free.  What you can’t see off to the right became pyramids which is where the controls were kept so that could deactivate the force field and rescue the prisoners.  As you can see we had a guard inside the force field as well.

magnatiles2

I love engaging in play with my nephew because I am amazed by his imagination every time.  I also loved playing with these toys because we got to practice problem solving (when they kept crashing on us), fine motor skills for building, bilateral coordination using helper hands (because otherwise its awful hard to maintain this structure while connecting the pieces).

What magnetic toys do you like?

November 23, 2012

Lego Fun and Pretend Play

Filed under: Developmental Milestones — Starfish Therapies @ 12:00 pm
Tags: , , ,

(This was not the original set-up I wasn’t proactive enough to photo that so I had to pull out some of the toys and arrange them on the carpet)

I was reading this blog post by ‘Dirt and Boogers’ and it reminded me of playing with my nephew just the other day.  We weren’t playing exactly the way they were but in the same way I was amazed by how his imagination was engaged as he played.  I mean, it wasn’t just lego vehicles and houses and people for him, it was the scene he was creating in his mind.  We had a mixture of Toy Story and Starwars Legos as well as typical legos, multiple Hess trucks/vehicles and a pirate war ship.  I believe there was also an Abominable Snowman figurine thrown in there as well. My cat and dog also made guest appearances as characters in the unfolding adventure.  First we had to build some houses (we had the pieces for a Wild West jail as well as a service station) and then we built additional vehicles (a moving van).  There was a safe that had money and there was a lump of gold that needed protecting (although not in the safe).  My nephew’s bed and desk and desk chair were all incorporated in as well.  He had specific paths and tunnels that he created for the bad guys to hide the gold and the good guys could follow but if I tried to take a ‘short cut’ without weaving in and out of the rungs of his chair and then going to the bed I had to start over because I didn’t follow the tunnel that was created by the bad guys.

I loved engaging in this imaginative play although I did notice that whenever I had a good idea he counteracted it with a new scenario or rule so that my guys never got control of the money…

Legos and other figurines are a great way to encourage imaginative play.  Depending on the child’s age you may need to set up some structure for them or if they are older let them define the structure.  You can use cardboard boxes to create roadways or waterways, or even make ‘buildings’ out of the boxes.  This will engage the child in drawing and coloring as well as decorating.

How do your children pretend?

October 1, 2012

Organizing Crafts for Use in OT


So I just wanted to take a moment to brag and show off the project our most recent OT student did.  She created a binder of crafts that can be used in OT sessions with instructions and a sample of each craft.  She also labeled each one for what skills the craft can address depending on how you focus it.  Depending on the child’s age and what you are working on specifically you may want to do it over several sessions or to have part of the craft finished ahead of time so that the child can focus on just one aspect such as cutting, coloring, pincer grasp, threading, visual scanning, etc.

I will try to post about some of the crafts in upcoming blogs.

What other great organization strategies do you use?

September 24, 2012

Make your own Magic Wand

Ok, we are big fans of Harry Potter so when I saw this post on how to make your own wand, I had to pass it along to our OT’s because I thought not only could it be ‘therapeutic’ in that kids could work on skills, but it would also be motivating.  This wand was made over several weeks and our OT and her kiddo would do a little bit each session.  It let the kiddo think about how they wanted the wand to develop and take the time to put the colors and designs in that she wanted.  This kiddo has a left hemiplegia so it really allowed her to work on using both hands to create the project.  She had to use her stabilizing hand to hold the stick while wrapping the string, also both hands need to be used for threading and tying knots to name a few.  I think the best thing it works on is encouraging a child to express their creativity and individuality in a way that can evolve with the project.

August 31, 2012

Horse Races

Filed under: Developmental Milestones — Starfish Therapies @ 12:00 pm
Tags: , , , , ,


Okay, I’ll be honest, I haven’t figured out how to make this ‘therapeutic’ but it can be fun and kids can learn and work on numbers all at the same time.  The reality is I just really liked the idea and wanted to share it!  My parents every year do a ‘Night at the Races’ activity and they have done many versions of it.  When I was a kid it was an actual movie and you had to pick the winner of the race similar to if you were actually at a horse race.  Since then they have made it much more interactive.  They have used ‘live’ horses (aka people) to move across the race track (a numbered path).  Each time their number is called the horse moves forward one place.  The number is generated by rolling a dice.  This goes until one horse reaches the finish line.  You can use broomstick horses like in the photo to make it even more realistic.

They have also made a game board with a set number of spaces (about 10) and used wooden horses that are numbered and move them forward each time their number is called.  Same idea as above but with wooden horses and a board instead.

I’m sure as I try this activity (maybe in our group) I’ll have more to say about it because it seems to me like it is a human board game which could have all sorts of fun variations.  It also seems like a fun activity to play as a family or for a birthday party or in a classroom.

I’d love to hear of variations or ideas you come up with!

May 28, 2012

A Simple Shift in Perspective

Filed under: Developmental Milestones — Starfish Therapies @ 4:38 pm
Tags: , , , ,

A photo from one of our previous ‘Fun Fridays’

Sometimes I’m amazed at how much I can learn from the kids I work with.  On Friday I was chatting with one of the kiddos about his day and he informed me that he got to play all day at school today.  So I asked about after school (when he came to therapy).  He answered yes.  When I dug deeper and asked about PT (which we were currently doing) he said that yes he was getting to play because today was ‘Fun Friday’ which means he gets to have fun.  I loved his perspective on this because we were doing the same type of exercises as we always do this current Friday (we do occasionally do fun activities on Fridays) but just because we call Friday’s ‘Fun Friday’ in his mind it meant he was playing.

I don’t think I processed the whole conversation at the time but later when I was thinking back on it, I realized how simple it is to change our outlook sometimes.  I think I am going to try to practice the ‘Fun Friday’ lesson more often.

Next Page »

Blog at WordPress.com.