Starfish Therapies

November 19, 2017

Carnival Games

Are you working on ball skills with any of your kids? Looking for ways to mix it up? At one of our recent group sessions, we had the kids play ‘Carnival Games.’ They were working on the same skills but we changed the context and to them, it was a whole different ball game (pun intended)!

Here were some of the games we did (we’d love to hear of any suggestions you might have so we can add to our repetoire):

bowling

  • Bowling – Line the pins up and have the kids practice underhand bowling. They get two chances to get the pins down. You can add visual cues such as a tape line to help them with their aim. Or two staggered spots to help them with their stepping into the roll. You can also change the size of the ball. They could start with a larger ball and use two hands to roll it (sometimes this helps them understand the concept of rolling a little easier). As they progress the ball can get smaller. For a real challenge have them stand on one foot or in tandem stance (one foot in front of the other) so they can work on their balance.
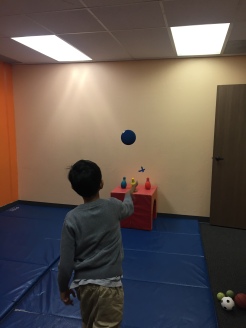
  • Knock the Cans Down – I’m sure there is a more official carnival name but we’ll just go with this! You can stack cups into a pyramid or you can use bowling pins like we did and recreate the bowling formation. They get two chances to knock everything down. As you can see we also added a visual cue behind the pins to help with aiming. You can use staggered spots on the floor to help with stepping into the throw. You can switch it up and work on overhand or underhand throwing. To challenge the balance, just like with bowling, you can do single leg stance, tandem stance, or you could stand on an unstable surface like a balance board or a pillow.

bucket toss

  • Bucket Toss – With this one the child is trying to get as many balls into the bucket as they can. They get a point for each one. You can mix it up if you want to work on underhand or overhand throwing. And you can challenge balance just like in Knock the Cans Down! Change the size of the ball or the density of the ball. You can use an o-ball for easier gripping or a ball that is deflated slightly to make it easier to hold onto. Lots of ways to vary the activity. And, you can use the visual cue on the wall to help with aiming!
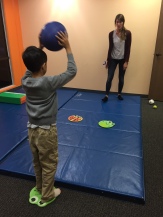
  • Hit the Spot – This game works on passing skills. You can put one or multiple spots on the ground and have the child work on bounce passing the ball to you while trying to hit the spot. Pick a number of times and they get a point for every time they hit a spot. If you are using multiple spots you can increase the challenge of the game by calling out what spot you want them to hit when they pass it. It also works on catching because you will be passing the ball back to them. They can have some fun with telling you what spot to hit also!

What are some other games you would include in your Carnival Games?

October 8, 2017

Dribbling a Ball

IMG_5143

We were recently working on ball dribbling skills with some kiddos. They had been practicing them off and on for a while but were still finding it hard to dribble the ball while walking down the hallway. So, we decided to spend one whole session devoted to bouncing the ball and progressing this skill. To do this we looked back at the how motor learning occurs and started with blocked practice of the basic skill and slowly added to it to get to the skill we wanted. The best part was that at the end of the session the words ‘that was easy’ were actually spoken – this was so great because when we first said we were going to go out and dribble down the hallway that same child said ‘oh no, that’s hard.’

  1. Using a spot on the ground and the wall behind the child we started with bouncing the ball in place on the spot. The wall was used to help provide a cue to stay up tall as there is a tendency to bend at the waist and get closer to the ball rather than bouncing the ball hard enough to come back up high enough. We let the child choose how they wanted to bounce the ball and it usually started with both hands bouncing the ball and then catching it and then bouncing it again.
  2. Next, using the same props/cues, we progressed to bouncing it with two hands up to 3 bounces. This way they were working on continuous bouncing and not bounce and catch. Once 3 was mastered we slowly progressed until we got to 10 successful bounces.
  3. Next, using the same props/cues, we repeated the above step but by bouncing with one hand. We continued to progress this until we got up to 10 successful bounces with one hand.
  4. At this point we moved into the hallway (and this is when the words ‘oh no, that’s hard’ were spoken). We had them dribble the ball while walking for up to 3 bounces. Most used two hands and we let them. Again we slowly progressed until we got to 10 successful bounces while walking.
  5. Next we decreased to one hand and repeated the above steps until we got to 10 successful bounces while walking. This was when it was declared ‘that was easy.’

At this point the child began dribbling the ball the full length of the hallway. What was fun to see was that there was control of the ball. Even when it bounced slightly to the left or the right, they were able to maintain control and keep dribbling forward!

Now, in subsequent sessions we will have to continue to practice this but ideally we can begin to decrease the number of steps and then begin to generalize the skill and introduce different games that involve dribbling.

How have you worked on dribbling with kids?

October 23, 2012

A Multi-Tasking Activity

Filed under: Developmental Milestones — Starfish Therapies @ 12:00 pm
Tags: , , , , , ,

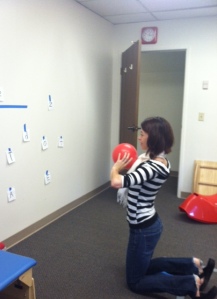
One of our OT’s was so excited last week to show us the new activity she was doing with a few of her kiddos.  She had just started it so she hasn’t had time to embellish it for pictures and make it look pretty!  Also, we had to wrangle one of our other OT’s in for the picture because no kiddos with photo rights were available at that time.

Basically she has a few kiddos who are working on balance, visual motor control and letter recognition.  So, in order to combine all three she has them standing on a spot (their feet aren’t allowed to leave the spot) and throwing the ball at whatever letter she calls out.  She currently has capitol and lower case letters because the kiddo this set up was for is working on being able to tell the difference.

When she showed me, I immediately loved the idea and came up with all different variations.  As the kiddos’ balance improves you can have them stand on one foot, or on a balance board or a balance disc.  You can have them work on maintaining stability in other postures such as high kneeling (like pictured) or half kneeling or staggered stance.  I also thought it could be used for numbers or colors as well and the ‘pictures’ on the wall could be adjusted depending on the child’s visual needs.  For instance, the white on white may be too challenging for some kids.

In addition to the learning and balance, it also helps kids with throwing and eye-hand coordination.  They have to be able to throw the ball (you can have them do overhand, underhand, two handed overhead, chest pass) and they have to be accurate with their throws.  It also assists with auditory processing because as the therapist calls out the target they have to figure out what they are hearing and then translate it to what is in front of them.

Another variation of this could be letter bowling.  You could have bowling pins with letters/numbers/colors on them and the child would have to work on rolling (which can be a hard skill to learn) the ball to knock over the correct pin or hit the correct target taped low to the ground.

How else have you used this idea and what skills have you worked on?

Create a free website or blog at WordPress.com.